context를 사용할 때
- 정보를 전달 할 때, 일반적으로 부모 컴포넌트에서 자식 컴포넌트로 props를 통해 정보를 전달하는데, 중간에 여러 컴포넌트를 거쳐야할 때가 있는데, context를 이용하면 깊이 여부와 무관하게 아래 트리의 모든 컴포넌트에서 일부 정보룰 사용할 수 있다.
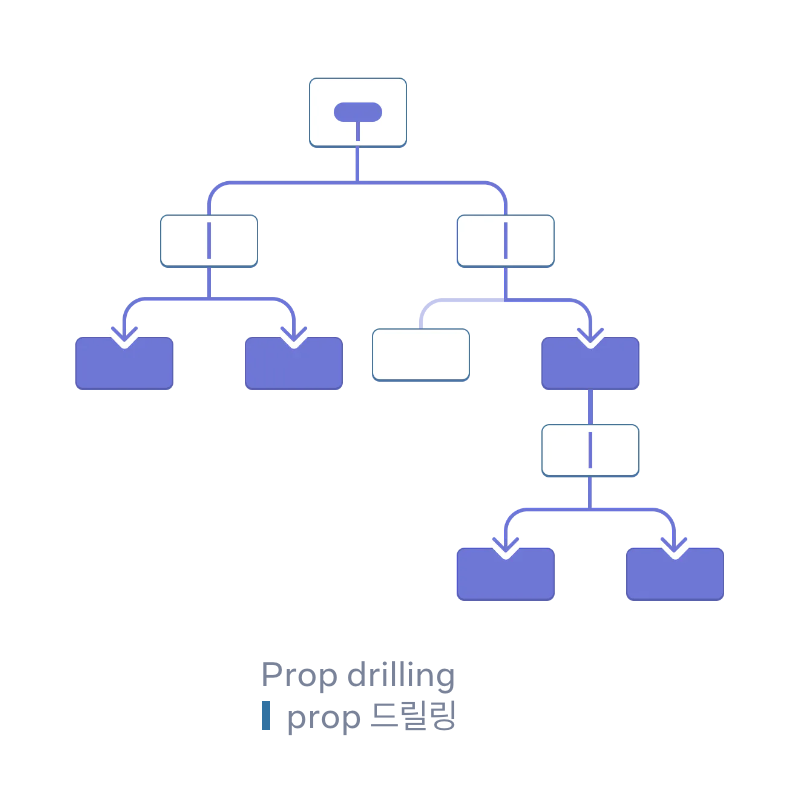
props 전달의 문제
- 트리 깊숙이 prop을 전달해야 하거나 많은 컴포넌트에 동일한 prop이 필요한 경우 prop 전달이 장황하고 불편해질 수 있다.
- 만약 최상위 컴포넌트와 멀리 떨어져있다면, state를 높이 끌어올리다보면 prop drilling이라는 상황이 발생한다.
Context: props 전달의 대안
- context를 생성합니다.
- 데이터가 필요한 컴포넌트에서 해당 context를 사용합니다.
- 데이터를 지정하는 컴포넌트에서 해당 context를 제공합니다.
Step1: Context 만들기
- 먼저 context를 만듭니다. 컴포넌트에서 사용할 수 있도록 파일에서 내보내기를 합니다.
import { createContext } from 'react';

export const LevelContext = createContext(1);
- createContext의 유일한 인수는 기본값입니다. 여기서 1은 가장 큰 제목 수준을 의미하며 모든 종류의 값(객체 포함)을 전달 할 수 있다.
Step2: context 사용하기
1. useContext 훅을 가져옵니다.
import { useContext } from 'react';
import { LevelContext } from './LevelContext.js';
2. Heading 컴포넌트는 props에서 level을 읽습니다.
export default function Heading({ level, children }) {
  // ...
}
3. 위의 코드에서 level props를 삭제하고, 그 함수 안에서 LeveContext에서 값을 읽습니다.
export default function Heading({ children }) {
  const level = useContext(LevelContext);
  // ...
}
4. Heading에 level prop을 전달할 필요가 없기 때문에 Section이 level을 받도록 JSX를 수정합니다.
<Section level={4}>
  <Heading>Sub-sub-heading</Heading>
  <Heading>Sub-sub-heading</Heading>
  <Heading>Sub-sub-heading</Heading>
</Section>
Step3: context 제공하기
//기존 코드
export default function Section({ children }) {
  return (
    <section className="section">
      {children}
    </section>
  );
}

//context provider로 감싸 LevelContext를 제공한다.
import { LevelContext } from './LevelContext.js';

export default function Section({ level, children }) {
  return (
    <section className="section">
      <LevelContext.Provider value={level}>
        {children}
      </LevelContext.Provider>
    </section>
  );
}
- context provider로 감싸 LevelContext를 제공하는 의미는 이 <Section> 안에 있는 컴포넌트가 LevelContext를 요청하면 이 level을 제공하라는 의미이다.
LevelContext제공했을 때 과정
1. level prop을 <Section>에 전달한다.
2. Section은 section의 children을 <LevelContext.Provider value = {level}>로 감쌉니다.
3. Heading은 useContext(LevelContext)를 사용하여 위의 LevelContext값에 가장 가까운 값을 요청합니다.
동일한 컴포넌트에서 context 사용 및 제공
//기존 코드
export default function Page() {
  return (
    <Section level={1}>
      ...
      <Section level={2}>
        ...
        <Section level={3}>
          ...
          )}

//변경된 코드

import { useContext } from 'react';
import { LevelContext } from './LevelContext.js';

export default function Section({ children }) {
  const level = useContext(LevelContext);
  return (
    <section className="section">
      <LevelContext.Provider value={level + 1}>
        {children}
      </LevelContext.Provider>
    </section>
  );
}
Context를 사용하기 전에
- props를 몇 단계 깊이 전달해야 한다고 해서 해당 정보를 context를 넣어야 한다는 의미는 아니며, 남용해서도 안된다.
context 사용하기 전에 고려할 대안
1. props 전달로 시작한다. 많이 전달할 수도 있지만, 그러다보면 컴포넌트가 어떤 데이터를 사용하는지 손쉽게 확인이 가능하다.
2. 컴포넌트를 추출하고 JSX를 children으로 전달한다. 이렇게 하면 데이터를 지정하는 컴포넌트와 데이터를 필요로 하는 컴포넌트 사이의 레어이 수가 줄어든다.
-> 이 두가지가 적합하지 않을 경우 context를 고려한다.
context 사용 사례
1. 테마: 앱에서 사용자가 앱의 모양을 변경할 수 있는 경우
2. 현재 계정: 많은 컴포넌트에서 현재 로그인한 사용자를 알아야 하는 경우
3. 라우팅: 자체 라우터를 구축하는 경우에 이러한 방식을 사용한다.
4. state 관리: context와 함께 reducer를 사용하여 복잡한 state를 관리하고 번거로움 없이 멀리 떨어진 컴포넌트에 전달하는 것이 일반적이다.
참고
'개발 공부' 카테고리의 다른 글
| [React+TypeScript] ShortPolling, LongPolling, SSE, WebSocket 차이점 (0) | 2023.09.24 |
|---|---|
| [리액트 공식 문서] Reducer와 Context로 확장하기 (0) | 2023.09.06 |
| [리액트 공식 문서] state 로직을 reducer로 추출하기 (0) | 2023.09.06 |
| [리액트 공식 문서] Quick start~ Thinking in React (0) | 2023.08.18 |
| .yarn 디렉토리가 없는 경우 (0) | 2023.07.10 |


